Thursday, December 22, 2011

Easy and Delicious Fudge


I've been experimenting with fudge and caramels. The fudge wins out. Caramel is so finicky. If I figure it out, you'll be the first to know (well maybe the second after my husband).

Today I'm busy getting ready to head to Oregon for the holidays but thought this recipe would be a good one to share with you just in case you need to make something for the holidays. This fudge is easy, foolproof and really good. And I'm not even a big 
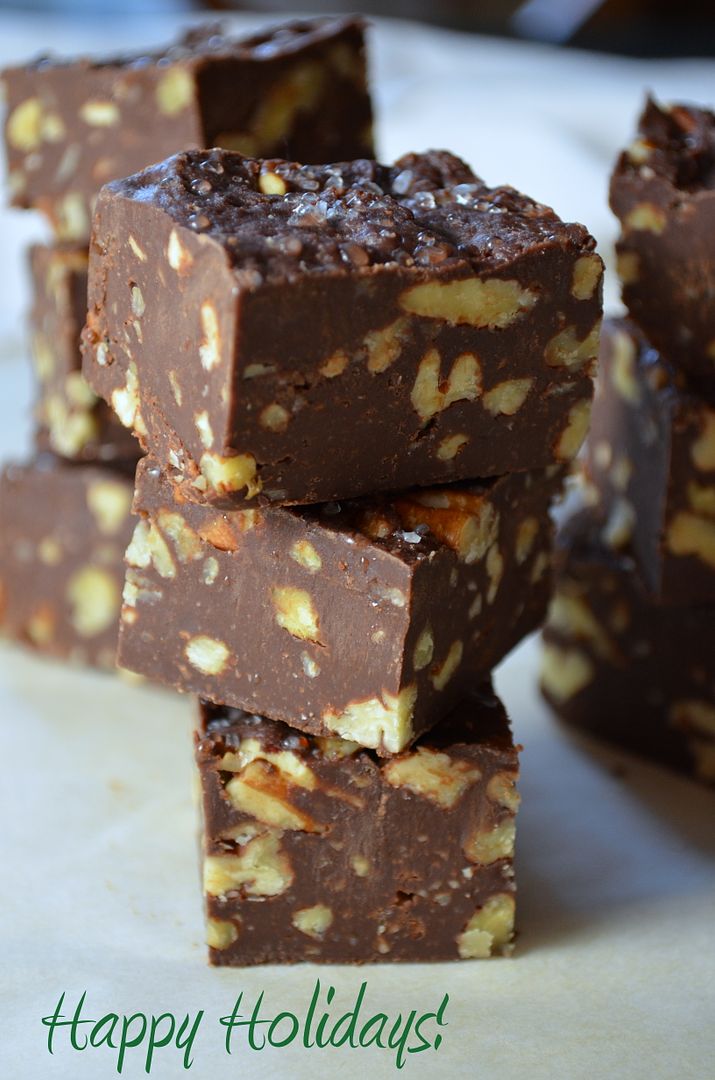
fudge loving person. But this one's rich, creamy, chocolatey and not too sweet. A little square of this is just right. 

You can add any kind of nut you like or leave them out. You could even add marshmallows to make a rocky road fudge. I'm sure someone you know would love to get this treat as a gift. 

Happy Holidays to you and your family!

Easy and Delicious Fudge

1 (14-ounce) can sweetened condenses milk
2 cups semisweet chocolate chips
1 cup bittersweet (60%) chocolate chips
1 teaspoon vanilla
1 cup or 8 oz. walnuts, chopped coarse
Course sea salt

Line the bottom of a 9-inch square baking dish with foil or parchment paper. Leave two inches overhanging on opposite sides so that you can remove the fudge from the pan.

Add the condensed milk and chocolate chips to a saucepan. Stir well. Add a pinch of salt. Cook over low heat until all the chocolate is melted and glossy. 

Add the vanilla and walnuts, and stir well to incorporate. 

Pour the fudge into the lined baking dish. Smooth it out. sprinkle with coarse sea salt. Let fudge come to room temperature and then put it in the fridge to firm up. Remove from pan and slice into small squares. 

Fudge can be frozen in an airtight container.

Print Recipe

Saturday, December 17, 2011

Eggnog Bread Pudding


This is definitely not diet food but it's a great dish for a Sunday morning or even Christmas morning. I've wanted to make something like this for the last couple of years but haven't gotten around to it. Last Sunday I got out the eggnog and first made my husband and I an eggnog latte and then started on this eggnog bread pudding. I love eggnog and when I saw a few different recipes for eggnog bread pudding that sounded good, I played around with the ingredients and came up with this one. We both liked the result...the hard part was waiting for it to bake! 

Feel free to add raisins or dried cranberries to yours. You can also sprinkle it with powdered sugar before serving. This is really good with a side of bacon, ham or sausage.

Eggnog Bread Pudding

1 16oz loaf Challah Bread, cut in 1 inch cubes
4 beaten eggs
1 cup milk
1 1/2 cups eggnog (purchased)
1/2 cup maple syrup
1 teaspoon nutmeg
2 teaspoons cinnamon
1/4 cup melted butter
1 tablespoon brandy (optional)

Preheat your oven to 350 degrees. In a large buttered baking dish (I used a 2 1/2 quart oval baking dish), add your cubed bread. In a mixing bowl, mix the eggs, milk, eggnog, maple syrup, nutmeg, cinnamon, butter and brandy. Pour over the bread. Take a spatula and press it down a bit so it is all covered by the liquid. I let mine sit for 20 minutes before I put it in the oven. Cover the dish with foil and bake for 30 minutes. Remove the foil and continue baking for another 15-45 minutes. It will depend on how deep your baking dish is. Mine was deep so it took the full 90 minutes. You want a knife inserted in the center to come out clean. If the top of the bread pudding starts getting to brown, cover it again with the foil. When done, remove from oven and let cool slightly. Serve with maple syrup. Serves 6-8.

Monday, December 12, 2011

Christmas Cookies


Last month I signed up to do "The Great Food Blogger Cookie Swap" with more than 200 other blogs. It was organized by Love and Olive Oil and The Little Kitchen. I had to make three dozen cookies, send a dozen to three randomly selected food blogs and three randomly selected blogs sent me each three different types of cookies. Fun, huh! About two weeks ago I started getting my cookies in the mail and all of them are really delicious. Here are a few pictures and links to their blogs.


Caramel Apple Cookies from Bananas and Beer
Mint Chocolate Whoopie Pies from Aris Menu
Chocolate Chip Oatmeal Fluffer Nutter Cookies from (TBD)

For my cookie swap recipe I decided to make Christmas cookies which are a nut and fruit cookie. The recipe comes from my grandmother. She made them a long time ago for us and I had never forgotten how good they were. Don't shy away from making these because of the ingredients. They are a simple butter cookies, not to sweet but a very tasty treat especially with coffee or tea. The fruit gives them a mild sweetness but you can't really tell what it is. And they're so pretty! Keep in mind you can leave out the nuts, change them up (same with the fruit - use what you like) and even better, you can keep these in a roll in your freezer and just slice and bake when you need them.

I shipped my cookies off on December 5th to these fellow bloggers.


On Thursday, December 15th you'll be to see a list of all the cookie recipes in the swap on Love and Olive Oil and The Little Kitchen.

Christmas Cookies

1 lb unsalted butter, room temperature
5 cups all purpose flour
1 teaspoon baking soda
1 cup brown sugar, packed
1 cup white sugar
1 teaspoon vanilla
1/2 teaspoon salt
3 eggs
1 cup candied cherries, finely chopped
1 cup candied pineapple, finely chopped
1 cup dates, finely chopped
1 cup pecans, finely chopped
1 cup walnuts, finely chopped
1 cup hazelnuts, finely chopped
1/2 cup Turbinado Raw Sugar

In a large mixing bowl, using a stand mixer or beaters, combine the butter, sugars, vanilla, salt and eggs. Add the fruit and nuts and mix well. Combine flour with baking soda and mix well. Gradually add flour mixture to wet ingredients. Using plastic wrap, shape into 2-3 inch wide rolls. Place in refrigerator and chill for at least an hour. When chilled, remove plastic wrap and slice in 1/2 inch cookies. Sprinkle with turbinado sugar. Heat oven to 350 degree and bake for 10-12 minutes. They'll be nice and soft if you remove them before they get brown. Can be frozen and will keep for months. Makes 10 dozen.

Print Recipe

Wednesday, December 7, 2011

Wow your guests (& friends)


I know everyone is crazy busy right now. I was in a store yesterday returning a few things and I piled my stuff on the counter and handed the lady my credit card. It was so busy we didn't even look at each other. Suddenly she says, "Oh hi. How are you?" I laughed and said hi back. We joked about how everyone is so busy moving a hundred miles an hour that we don't even take a moment to say hi or smile. It just reminded me to slow down, to be courteous and be aware. Otherwise what is Christmas all about. So if you can, hit pause, take a breather, refocus so that you can enjoy some of the holiday season too. And if not, just smile and fake it. :-)

This recipe brings back fond memories from my childhood as my mom made these Olive and Cheese Crostini's from time to time. With my dad being in the military, my mom swapped a lot of recipes with fellow military wives. Many recipes come from cherished squadron cookbooks that contain favorite recipes from everyone in the squadron. These cookbooks are like gold as they contain some of the best recipes. This is one of them. 

I'm really serious when I say this recipe will impress your guests. Just one bite and they'll be hooked. But don't wait for a special occasion to make them. They are great as a snack or for lunch. They might not look that good or sound that delicious but trust me, they are one of my favorites. It makes for a "you can't eat just one" perfect holiday recipe. Not to mention, they're easy to make.

Olive and Cheese Crostini  

1 small can chopped black olives
1/2 stick butter, room temperature
2 1/2 tablespoons mayonnaise
1/2 teaspoon salt
1 teaspoon lemon juice
1/2 stalk green onion, chopped fine
1 cup sharp cheddar cheese, grated
1 loaf french bread or Filone bread (this is what I used), slice 1/2 inch thick

Preheat your broiler to low. Mix all the ingredients together in a small bowl. Spread about a tablespoon on each slice of bread. Place on a cookie sheet. Place under broiler and watch really closely so they don't burn. Once they are bubbly and slightly browned, take out the oven and let cool. Really good warm but tasty anyway you want to eat them. If you want them to look really pretty, sprinkle some chopped parsley over the top before serving. 

Print Recipe

Thursday, November 17, 2011

Simple Mashed Sweet Potatoes


Sweet potatoes or yams? A friend of mind asked me that question this week and I couldn't remember the difference. 

There are two types of sweet potatoes, the paler-skinned type has a thin, light yellow skin with pale yellow flesh which is not sweet and has a dryer, more crumbly texture, similar to a white baking potato. The second type has a darker skin (which is sometime referred to as a yam in error) with a vivid orange, sweet flesh and a moist texture. That is what I have used here. 

Yams are not even related to the sweet potato and are the tuber of a tropical vine. They have a higher sugar content so are sweeter than the sweet potato, but have a brown or black skin and an off-white, purple or red flesh. Most likely if you buy a yam in the grocery store, it's really a sweet potato.


I probably make this recipe once a week. Lately it has become our go to dish for potatoes. I love the color, the flavor and the creaminess of the dish. There is just a hint of sweetness but they are rich and satisfying. And you're getting a little extra nutrition by eating these over regular white potatoes which doesn't hurt.


These are so simple. Peel, boil, mash, add butter, honey, salt and pepper and you're done! This would even work for Thanksgiving. You could sprinkle some candied walnuts or mini marshmallows on top and then put it under the broiler for a few minutes.

Simple Mashed Sweet Potatoes

3 lbs. sweet potatoes, peeled and cut into 1-2 inch cubes
1 stick of unsalted butter
2-3 tablespoons of honey (depends on how sweet you like it - I used 2)
Salt and pepper

Add your cut up sweet potatoes to a large pot of salted water. Turn your heat on high. Add a lid if you want it to boil faster. Once it starts to boil, remove the lid and turn your heat down to a low boil. After five minutes, poke the potatoes with a fork to see if they are tender. They don't take very long! If they are tender, drain the liquid from the pot. Add the butter, honey and season with salt and pepper to taste. Serves 8.

Tips: 
-Try to cut the potatoes all the same size so they cook at the same rate. 
-This recipe makes a lot so you can adjust the recipe according to your needs. 
-Make sure you season them well with salt and pepper. Taste after each addition until you get the flavor just right. Salt will really bring out the flavor of your dish. This is why dishes taste so good at restaurants because they add salt but a lot more than you or I would. 

Monday, November 14, 2011

Roasted Asparagus Bundles with Prosciutto


Asparagus. Prosciutto. Garlic. Toasted breadcrumbs. Uh yum.

Since Thanksgiving is around the corner I thought I'd share some special recipes that are perfect for the occasion. Not only does this one taste good but you'll really impress your guests.

I discovered this recipe a few years ago. It goes nicely with a simple piece of meat or fish because it has so much flavor. If you haven't cooked with prosciutto before, give it a try. It's a dry cured ham that's different from bacon but has amazing flavor. You can find it in almost any grocery store and I usually keep some in the freezer until I need it. 

I'll be with family this year for Thanksgiving and in the kitchen cooking with my mom and grandmother. We are all headed to southeastern Idaho where most of my family resides. We decided to drive the 12.5 hour trip so we can pick up some lamb meat from my uncle's farm the Thomas Sheep Ranch. The sheep ranch was started by my great, great grandfather and has continued successfully now for four generations with my grandfather, who passed away in 2005, and now my uncle. They produce the best lamb you will ever taste - I only wish you could! I know it's a serious claim to make but the meat is amazing.  Anyone who has tried it always thinks I've marinated it and all I've done is added salt and pepper. Needless to say, we are looking forward to restocking the freezer.

In the meantime though I need to make two pies - an apple and pecan pie for the trip. I have scoped out a new pie crust recipe and can't wait to try it. I'll let you know how it goes. :-)

Here are some previously posted thanksgiving recipes just in case you are looking for something new to try - Sweet Potato Casserole, Broccoli Casserole, and Easy Cheesy Brussel Sprouts.


Blanch the asparagus in boiling, salted water.


Brown the breadcrumbs in oil and garlic.


Prosciutto Di Parma - very thinly sliced.


Roll the asparagus up in the prosciutto. Works best by keeping the paper underneath the slice.


Pull the paper off as you roll up the asparagus.


Place in a baking dish or sheet and sprinkle breadcrumb mixture on top. Bake.


Devour.


Roasted Asparagus Bundles 

1 tablespoon butter
1 large bunch of asparagus, washed and trimmed to even lengths
Salt and pepper
Seasoned breadcrumbs
8 thin slices prosciutto
2 tablespoons olive oil

Seasoned Break Crumbs:

1/4 cup Panko breadcrumbs
2 teaspoons olive oil
2 cloves finely minced garlic
1/2 teaspoon black pepper
1 tablespoon finely chopped fresh parsley
1 teaspoon grated lemon zest
1 tablespoon freshly grated Parmesan

Preheat the oven to 350 degrees. In a large saucepan, heat enough water to cover asparagus. When boiling, salt the water and add asparagus. Cook for 4 minutes. Drain and set aside.

Grease a large baking sheet or dish with butter. Set aside. In a medium saute pan, add 2 teaspoons of olive oil. When hot, add garlic and saute for a minute, careful not to burn. Add in breadcrumbs and pepper. Stir until start to brown slightly. Remove from the heat and pour into a mixing bowl. Add parsley, lemon zest and Parmesan. Toss to combine.

Take a slice of prosciutto and lay flat. Add 3 asparagus and roll up in the prosciutto. Place in baking sheet. Complete the rest. Sprinkle the breadcrumbs on top. Drizzle with 2 tablespoons of olive oil. Bake for 20 minutes or until breadcrumbs are nicely brown. Serves 4-6.

Adapted from Michael Chiarello
Print Recipe

Thursday, October 27, 2011

Easy Pumpkin Cookies


Trick or treat...Halloween is almost here. Are you dressing up this year??? I love Halloween but I hate trying to come up with a costume so I rarely do. I always want it to be the perfect one and you know, it just takes to much effort. At this point, I would throw on a mask, paint my face or buy a costume just so I wouldn't have to think about it. Kudos to all of you that create your own costumes.

When I was growing up, my mom always helped us come up with a great costume. One year my brother and I dressed up as an old married couple - I as the husband and my brother as the wife (high heels and everything). We fooled the whole neighborhood. Another year I was a witch and my mom added a big wart to my face made out of a chopped walnut and coconut mixed with peanut butter. It was great. She is the creative one in the family. 

Here's picture of my brother (on the right) and I dressed up as husband and wife almost 30 years ago. 


This time of year and I especially love being able to break out the cans of pumpkin. Pumpkin is so versatile as you can use it in so many things. Soups, cakes, cookies, drinks, muffins, cheesecake, pancakes - the list is endless. Often you can't even tell that there is pumpkin in the dish or baked good, it just makes everything moist and delicious.

I remembered having these cookies at my grandma's house quite a few years back and loved them. I called her the other day and asked her for the recipe. She is not one for writing a recipe down - it's just a little of this and a little of that. The trait of a great cook! Thankfully this one is very simple as you'll see. And just to take them a step further, I added a cream cheese frosting. You certainly don't need to frost them and if you prefer a regular vanilla or chocolate icing, this would be delicious too.

I'm sure many of you are busy with kids and this is the perfect recipe to whip up in no time. Your kids will love them! You could even add chocolate chips to this recipe. I must warn you though...they are addictive just as they are. It's hard to eat just one.

Easy Pumpkin Cookies

Cookie
1 box Spice Cake Mix
1 15oz can pumpkin
1 egg
1/2 cup chopped walnuts

Cream Cheese Frosting
1 8oz package cream cheese, room temperature (can use lite)
1/4 cup butter, room temperature
1 teaspoon vanilla
1 cup confectioner's sugar 

Preheat oven to 350 degrees. In a large mixing bowl, add spice cake mix, egg, and the can of pumpkin. Mix until all combined. Drop by rounded tablespoon on to a greased baking sheet. It doesn't hurt to flatten them out a bit as they don't melt much during baking. Bake for 12-15 minutes or until they are slightly firm to touch.Frost when cool and sprinkle with nuts if you'd like.

To make the frosting, add all the ingredients to a mixing bowl. Beat until well combined.

I like to keep these cookies in the refrigerator since they are very moist. Enjoy!

Courtesy of my Grandma Baker

Thursday, October 13, 2011

Raspberry Cream Parfait


No my raspberries are not really that bright and beautiful but they do taste that good.

I'm having so much fun with all the new picture editing sites. You can make photos look old, grainy, pop with color...pretty much anything you want.

I took over my husband's new iPhone this past weekend when we went to San Francisco for Fleet Week. Of course I downloaded a bunch of photo apps to play with and as you can see I had a great time taking pictures of big ships and airplanes flying over our heads.


Anyway, back to dessert. Try taking just one bite of this one.

I love mascarpone, cream, raspberries and sugar so I put them all together to form this lovely parfait. With a few bites you get sweet, creamy, a bit of tartness from the raspberries and crunch from a cookie. A perfect bite!

When you create a dessert, the more textures and flavors you can combine together - meaning crunchy, sweet, sour, salty, etc..., the more tantalizing the dessert will be on your taste buds.

This one is rich so if you have some small glasses or even miniature dessert glasses, use them. You only need a few bites to enjoy this dessert. 

You can whip up this up in no time and even make it ahead of time. Strawberries would be really good used here - really any berry. I actually got this idea from a dessert I used to make with strawberries and mascarpone. Mascarpone is so good sweetened and with fruit. It's an Italian cheese similar to cream cheese. You should be able to find it in any grocery store but if not substitute light cream cheese. 

I added a crushed amaretti cookie to the top so that you get a bit of crunchiness. You can use any kind of hard, crunchy cookie.

Raspberry Cream Parfait

3 cups raspberries + a few extras for garnish - frozen or fresh
1/4 cup + 3 tablespoons sugar or sugar substitute like Ideal
8 oz mascarpone cheese
1 cup heavy whipping cream
1 tablespoon Chambord (raspberry liquor)or substitute 1 teaspoon vanilla
3-4 amaretti cookies, crushed
Fresh mint sprigs, garnish (optional)

In a small saucepan over medium heat, add 2 cups of raspberries, 3 tablespoons sugar, and 1 tablespoon water (if using frozen berries - if using fresh - 2 tablespoons water). Stir to combine. Let cook until berries break down and mixture thickens about 10-15 minutes, stirring often. Taste to see if raspberries are sweet enough for you - you can add more sugar if you prefer them to be sweeter. Turn off heat and add additional cup of raspberries and stir gently to combine.

In a medium mixing bowl, add mascarpone, 1/4 cup sugar, and liquor. Mix well. In another bowl, whip heavy whipping cream until stiff peaks form. Gradually fold cream into the cheese mixture.

In dessert glasses, add a large heaping tablespoon of raspberries. Add a heaping tablespoon of the cream mixture. Add another heaping tablespoon of the raspberries. This part is really up to you as to how many layers you want. Depending on how big your dessert glasses are you'll have to adjust accordingly. The goal is to layer each so you get both in a single bite - and it really looks pretty especially with a fresh raspberry on top and a sprig of mint.  Serves 6-8.

Monday, September 26, 2011

Sauteed Zucchini with Pecorino and Onions


I used to be a huge vegetable person growing up. I thank my mom for this as it was ingrained in my brain that a balanced meal was one that contained some kind of vegetable. When I went to college, I started eating meals that were cheap and fast like macaroni and cheese, Funions - fake fried onions, ramen noodles, baked potatoes with cheese and ranch dressing. I think most of us have done this at one time or another - maybe it's just when things are crazy at work or home and you don't have time to cook a good meal. We do the best we can at times.
Now that I'm older (and hopefully wiser...fake onions??) I do try to always have a vegetable with our meal. Sometimes it's because of guilt...that little voice in my head saying, you must eat your vegetables, you must eat your vegetables. But for the most part, I really do enjoy them. Zucchini is one of my favorites. I forget about it though and seem to eat mostly broccoli and spinach. Every now and then, I remember it longingly and venture out to buy some. I did this recently and ended up making a really tasty dish (that we've now had three times!) that I'm sharing here with you guys. Yes, I did add some cheese...and butter but at least we are eating our vegetables.


I could eat this by the bowl, all by itself. The key is to caramelize the zucchini. You may not be able to tell by the photo but if you let the zucchini brown a bit, it enhances the flavor even more. Kind of like caramelized onions. This dish has so much flavor, you won't believe it. With the sharp cheese, the sauteed onions and caramelized zucchini. So good! If you don't like zucchini, give this one a try. Even my husband liked it.

Sauteed Zucchini with Pecorino and Onions 

4 medium sized zucchini, washed and sliced 1/4 inch slices
1 yellow or red onion, quartered and sliced thinly
2 tablespoons grapeseed oil (can use EVOO)
1 teaspoon Nature's Season Seasoning (can substitute salt and pepper)
1 cup of finely grated pecorino cheese
2 tablespoons butter

In a hot saute pan, add the grapeseed oil and then add your zucchini, onions and Nature's Seasoning. Give them a quick stir to coat. Keeping your heat on medium, let the zucchini cook, stirring them every minute or so. You don't want them to burn, just brown. Cook for about 5-7 minutes or until slightly brown and soft. Reduce the heat if necessary if they turn brown and are not quite soft yet. When they're done, add the cheese and mix well. Turn off the heat and add the butter. Gently stir to combine. Serve hot!  Serves 4-6.

Thursday, September 15, 2011

Cheesy Vegetable Gratin


Where does the time go? Can you believe summer is almost over and it's time for orange sweaters, knee-high boots, Halloween candy, leaves falling from the trees and cool days?

I love the fall but I'm still relishing the last few weeks of summer and warm weather. It seems summer came late this year. We've had more warm evenings in September than in August which is definitely unusual.

Here is a dish to celebrate the end of the summer. It's delicious and you'll like vegetables that you normally don't like when they're in this dish. Trust me on this one.  If you have summer vegetables you need to use up like corn, zucchini, yellow squash, or tomatoes, I urge you to give this one a try. You can leave out what you don't like and add in ones that you do...the kitchen is your canvas.

This dish is great for leftovers. Serve with chicken, fish or any meat for that matter. You could add a salad or just have this, either way you'll have a very nice meal. 

I used a seasoning in this dish called Nature's Season Seasoning. My mom and I have used this seasoning for a long time on vegetables and it's really good. It adds flavor and wakes veggies up. We have always been able to get it at the grocery store. If you don't have it for this dish, just use salt and pepper. 

I urge you to season each layer of your dish with salt and pepper. It adds so much flavor when dishes are seasoned properly. If you cook this way, you won't need to put salt and pepper on the table because everything will already be seasoned perfectly.  


Slice your squash in 1/4 inch slices.


Layer your buttered dish with the squash.


Add sliced tomato, shallots and basil.

Bake for 25 minutes.


Add the rest of the ingredients - cheese, egg and more fresh tomatoes, basil. Bake!


Goodness right out of the oven. Let it sit and cool a bit and then serve...yum.


Cheesy Vegetable Gratin

1 lb. yellow squash or zucchini, cut into 1/4 inch slices
1 lb. ripe tomatoes, sliced 1/4 inch slices
1/2 onion, sliced (I had shallot on hand so used this)
1 teaspoon Nature's Season Seasoning
1 tablespoon butter
2 tablespoons olive oil
1 1/2 cup whole milk (to make it lower in carbs, I used cream and omitted the cornstarch)
2 tablespoon cornstarch
3 large eggs
5 ears of corn, with the kernels cut off or 1/2 bag of frozen corn.
1/4 cup chopped fresh basil
3/4 cup Panko breadcrumbs (or regular breadcrumbs will work)
3/4 cup shredded extra-sharp Cheddar cheese
1/2 cup shredded Mozzerella cheese

Preheat over to 400 degrees. Butter a 9x13 baking dish. Add a layer of squash, overlapping if necessary. Add half of the tomatoes layered on top of the squash and then the sliced onion. Drizzle with 1 tablespoon of the oil. Sprinkle with the Nature's Season or salt and pepper. Add half of the basil. Place in the oven for 25 minutes.

In a large bowl, whisk milk, cornstarch, and salt and pepper. Whisk in eggs. Mix well.

In another bowl, combine panko, 1/4 cup of cheddar, salt and pepper, and remaining basil and oil. Mix well to combine.

After veggies come out of the oven, sprinkle remaining cheeses over the roasted vegetables. Top with corn. Pour milk mixture over it all. Add remaining raw tomatoes. Sprinkle with the panko mixture.

Bake 25 to 30 minutes or until browned and a knife inserted in the center comes out clean. Cool 10 minutes and then serve.

Serves 12 or 6 if served as a main dish.

Adapted from Good Housekeeping


Thursday, August 18, 2011

Easy Chocolate Ice Cream


What is summer without ice cream? It always seems like summer gives us an excuse to eat more ice cream. At least it does for me. :-) I don't know about you but I hardly ever break out my ice cream maker. I should, it's not like it's difficult to use. After looking on the back of the ice cream container from the grocery store, I want to break out my ice cream maker. Have you seen all the strange ingredients listed on most ice creams, most of them unpronounceable. I'm not sure why because you only need a few things to make ice cream - milk, half and half, cream, sometimes eggs, flavorings (chocolate, vanilla, etc..), and sugar. 

When I saw this recipe I thought wow, I have to try this. There are just a few ingredients and I don't need my ice cream maker. I know a lot of you could use a recipe like this even if it's only for special occasions. Besides you can add anything you like to it - marshmallows, chocolate chips, coconut, strawberries.

Try it, you'll love it. A little tip. If you leave it in the freezer for a while, take it out and let it sit for a few minutes to soften up before you serve it.


Easy Chocolate Ice Cream

1 teaspoon espresso powder
1 tablespoon hot water
4 ounces bittersweet chocolate, chopped fine (you can substitute any kind of chocolate you like)
1/2 cup chopped nuts (I used almonds)
1/2 cup sweetened condensed milk
1/2 teaspoon vanilla extract
pinch salt
1 1/4 cups heavy cream, cold

Combine the espresso powder and hot water in a small bowl and mix until dissolved. In the microwave, heat the chocolate, sweetened condensed milk and coffee mixture. Takes about 1 minute but check every 10 seconds and stir.  Once chocolate is melted add your vanilla, nuts and salt. Let mixture cool.

With an electric mixture, beat heavy cream on medium to high speed for about 2 minutes. You want soft peaks. Whisk one third of cream into chocolate mixture. Fold remaining whipped cream into chocolate mixture until incorporated. Freeze in an airtight container for at least 6 hours, until firm, or up to 2 weeks. Makes 1 quart.

Adapted from Cooks Country
Print Recipe 

Monday, August 8, 2011

6 Hour Tri-Tip Marinade


It's hard to take an appetizing picture of meat. I tried. If only you could smell it, or take a little sample through the screen. It's juicy, flavorful and tender. This is an easy marinade that you can do in only six hours. That means you can start marinating it at noon and have a really yummy tri-tip that evening. The ingredients sound a bit strange but it all comes together. Trust me!

I'm always playing around with marinades which can turn a good piece of meat into a great one. The night I made this, my husband said he wasn't that hungry and took two small slices. He devoured the two slices and went back for more. That's when you know...it's a good marinade. Enjoy!

6 Hour Tri-Tip Marinade

1/2 cup lemon juice, fresh is best
1/2 cup grapeseed oil, you can use any oil (canola, olive oil)
1/4 cup honey
1/4 cup soy sauce
1/8 cup black pepper
1/4 cup garlic salt
1/4 cup chopped garlic
1/8 cup granulated onion
1 (2 lb) tri-tip

Mix all the ingredients except the beef in a large bowl or large ziploc bag. Add tri-tip and cover with the marinade. Place in the refrigerator for 6 hours.
Grill over medium heat until the meat reaches your desired temperature. Let it rest 5 minutes covered loosely with foil before slicing. Adapted from Deane Carr.


Print Recipe

Monday, July 25, 2011

Very Berry Fool


It finally feels like summer! We've had a great weekend going into the city (San Francisco) with friends for delicious dinner and then last night to a really fun outside concert. You know the kind where everyone brings a blanket, food and wine. We spread out on a huge lawn and shared food with friends and neighbors while listening to great music.

This recipe came about a couple of weekends ago when we had some friends over for dinner. I wanted to make a new dessert, something summery. I found a version of this Fool on line and thought it looked to good to pass up. Cool, creamy and light - perfect for summer. It's even pretty to look at. It's sure to become one of your favorites. 

Keep in mind with this dessert you can substitute any type of berry like raspberries or blackberries. Whatever you like. There are a few steps to this dessert but don't shy away from it as they are worth the effort.

I'm always experimenting with low carb recipes and this recipe works well as a low carb dessert. I swap out regular sugar for erythritol which for me made it sweet enough. If you prefer yours sweeter, you can also add a 1/4 teaspoon of stevia extract which has no bitter taste. Also, if you only have frozen fruit (thawed) that works too in this recipe. I used frozen blueberries since I didn't have any on hand.

Berry Fool

2 pints strawberries, cleaned
1 cup blueberries, cleaned
1/2 cup sugar + 2 tablespoons sugar or erythritol
1 package of gelatin or 2 teaspoons
2 cups heavy whipping cream
1/4 cup sour cream
3/4 teaspoon vanilla
3 butter cookies (any kind), crumbled   

Mix 1 pint of strawberries, blueberries, and 1/4 cup sugar in a food processor or blender and mix for 1 minute or until smooth. Strain mixture to remove any seeds or skins. You should have close to 2 1/2 cups of liquid when done. Take 1/2 cup of the puree and add the gelatin to it and mix well. Set it aside for 5 minutes to thicken or bloom. Take the remaining puree and in a saucepan heat it until warm, not boiling. Add gelatin mixture to the warm mixture and stir well to combine. Cover the mixture and refrigerate for 2 hours.

Take the other pint of strawberries and cut each into 1/4 inch dice. Feel free to add 1/2 cup of blueberries to this mixture if you'd like. Add 2 tablespoons of sugar and mix well. Cover with plastic wrap and refrigerate for at least 1 hour so the berries can macerate

After two hours, add 1 cup cream, sour cream, 2 tablespoons sugar and 1/2 teaspoon vanilla to a mixing bowl (can use a stand mixer). Beat mixture on low for 30 seconds, then medium on 30 seconds and then on high until you have stiff peaks. Tip: Putting your mixing bowl and beaters in the fridge or freezer will speed up this process. Add 2/3 of strawberry puree to the cream mixture and mix well. Fold the remaining 1/3 of puree into the cream mixture until just blended. Don't over mix. 

Drain diced berries that have been macerating.

Using some nice dessert glasses, layer drained berries and cream mixture into glasses. I started with berries and ended with berries. If not ready to serve, refrigerate. 

Just before serving, beat the remaining cup of cream, 2 tablespoons sugar and 1/4 teaspoon vanilla until stiff peaks form.  Add a dollop to the top of each dessert glass. Garnish with crushed butter cookies and if you really want to be fancy, a sprig of mint looks really nice. Serves 5-6 depending on the size of your dessert glasses. Adapted from America's Test Kitchen.

Sunday, July 17, 2011

Strawberry Spinach Salad


As promised, here is another delicious summer salad. You might be thinking strawberries in a salad? How weird is that. It is unusual but really good. I think it's the mixture of all the ingredients of this salad that make it so good. A bit of cheese, nuts and onion with a tangy but slightly sweet dressing. It all goes together to make a really light and refreshing salad. It's great served with a piece of fish or chicken or as a first course.

I mentioned in my last post that we were off to Kauai for vacation. It's been a week now that we've been back and it seems like forever ago. It was a really relaxing and fun vacation. Kauai is now my favorite Hawaiian island. So lush and green as you can see from the picture. This was the view from our patio. Rough, huh?


We did lots of fun stuff like kayaking, zip-lining, snorkeling - my otherwise sit behind a desk body was in shock most of the time. What's funny about Kauai are all the chickens running around. They are everywhere. I guess a few years back they had a bad storm and all the chickens got loose from their pens. The locals just forgot about them and as such, they have multiplied, quadrupled and are literally EVERYWHERE! For a last minute vacation, it was great and I highly recommend some R&R if you haven't had any for a while. It does the body and mind good!

Back to the recipe. Keep in mind if you don't like any of these ingredients do a swap for those you do like. I have used regular spring lettuce instead of spinach. I have used blue cheese, feta or goats cheese instead of Gorgonzola. I always soak the onion in ice water for about 30 minutes before I put them in the salad. This removes the really oniony smell and bite. Usually people that don't like onion will eat them this way. I used Fig Balsamic in this salad but you can use regular balsamic dressing. If you do use regular balsamic, it would be even better if you cooked it down a bit. As it condenses, it gets sweeter and thicker for a really nice drizzle over the salad. Enjoy!

Strawberry Spinach Salad

6 oz washed baby spinach (or 1 bag)
1 pint strawberries, washed and sliced
1/2 medium red onion, sliced and soaked
4 oz Gorgonzola cheese, crumbled
1/2 cup sugar coated walnuts, chopped (I get them from Trader Joe's - just slightly sweetened - located by the other nuts)
2-3 Tablespoons Fig Balsamic Dressing
2-3 Tablespoons Extra Virgin Olive Oil
Salt and Pepper

In a large serving bowl, add the spinach, strawberries, and onion. Add the dressing and olive oil and mix well. Divide up among serving bowls, add salt and pepper to taste and sprinkle the Gorgonzola and nuts on top of each. Serves 4.